Note: Text in italics are my comments. They are not
necessarily a part of the procedure, but are notes about problems I had
or things I may have done differently.
The first thing that needs to be done is to determine the architecture
of the system. In this particular case, it is fairly simple and is shown
in the figure.
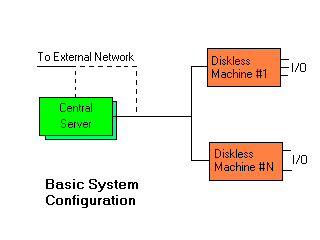 Here all of
the basic elements are shown. The Central Server is on the left
and is comprised of a machine with on-line storage while the Diskless
Machines are on the right. In each case the Diskless Machines would
have only the I/O suited for its tasks and would thus differ from each
other. Although this project will only have one
Diskless Machine, there may be any number as required by the application.
Also, the server may be any degree of complexity including redundancy
as indicated by the shadowed box. Again, this project does not address
this specific aspect of an implementation. Finally, the figure shows a
connection to an external network. The connection is shown as a dotted
line. For this project, the external network is connected directly to
the system network as the 'in-house' network is already a private system.
For security, it may be more desirable to have the Central Server act
as a firewall and thus prevent direct access from the outside world to the
system. The decisions for this must be based on the various trade-offs
of easy access and security. The various segments of the application
would need to be written accordingly.
Here all of
the basic elements are shown. The Central Server is on the left
and is comprised of a machine with on-line storage while the Diskless
Machines are on the right. In each case the Diskless Machines would
have only the I/O suited for its tasks and would thus differ from each
other. Although this project will only have one
Diskless Machine, there may be any number as required by the application.
Also, the server may be any degree of complexity including redundancy
as indicated by the shadowed box. Again, this project does not address
this specific aspect of an implementation. Finally, the figure shows a
connection to an external network. The connection is shown as a dotted
line. For this project, the external network is connected directly to
the system network as the 'in-house' network is already a private system.
For security, it may be more desirable to have the Central Server act
as a firewall and thus prevent direct access from the outside world to the
system. The decisions for this must be based on the various trade-offs
of easy access and security. The various segments of the application
would need to be written accordingly.
The rest of this document is divided into the following three sections:
You should be able to use the links provided to navigate between these
sections and return to the top as needed.
Once the Central Server has been identified, the primary system should
be installed on it. In this case, Slackware 7 was installed.
Basically this was a full install with everything. In anticipation
of doing development work, I wanted to have the usual development tools
available for C++, Tcl/Tk, Perl, etc. During the install process,
X-Windows was installed as well. Although not needed at this time, it
may come in handy later.
This system consists of:
- 80486DX4 at 100MHz
- 32M RAM
- Standard VGA Display (Trident 9440 Chipset)
- 1.2G Hard Drive
- 1.0G Hard Drive
- 1.44M Floppy Drive
- Ethernet card (NE-2000 clone - easily available)
- Mouse
- CD-ROM
This list is given not as a minimum requirement list, but to be an
illustration that you don't need the latest and greatest nor the fastest
in order to support Linux in this type of configuration. Just for the
record, the Linux kernel version as distributed with Slackware 7.0 is
2.2.13. There may be some advantages to upgrading, but this was not
evident during this project.
The hard drive partitioning is as follows:
- /dev/hda1 - 192M as /
- /dev/hda2 - 64M as "swap"
- /dev/hda3 - 192M as /home
- /dev/hda4 - 749M as /mp3
- /dev/hdb1 - 1.0G as /usr
The only things 'unusual' about this arrangement might be the /mp3
and /usr assignments. The /mp3 assignment was that I had expected to do
some playing around with MP3, but it didn't happen, yet. And the /usr
assignment was because I didn't want to hit any limits while doing
kernel recompilations.
Just a note about the installation process: While doing the
installation, I ran into problems with the CD-ROM not being able to
reliably read the files. A typical error was something like "Read
error on (file name): Input/output error at beginning of tape..."
I finally realized that these errors came from the tar utility and
were due to these CD-ROM problems. Eventually, I did a network
install from another machine. This is one of the points that I liked
about Slackware: You can install it on a machine that has no CD-ROM
but does have a network interface.
OK, that takes care of the standard set-up of the main system. There
are several things that must be done. The order they are done is not
important, but they must all be done before this whole thing will work.
Before I get into any details, I must point out that these procedures
are covered in various documents. The most important for me were:
The first reference is the key reference for this project. The
others provided supplementary information. Now, to get into the details...
- Setup the main system to act as an NFS server
- The key point here is to select "Root file system on NFS" in the
kernel configuration and recompile. Since you'll be using BOOTP,
be sure to select "BOOTP support" while you're at it.
- Define the Diskless system in /etc/hosts
- There may be other approaches, but what worked for me was to
define an entry in /etc/hosts that provided a name and an IP
address for the diskless machine. It appears that bootptab prefers
to work with a name as compared to a numeric IP address. For this
discussion, I'll use the name dcname.
- Define the directories to be used by the diskless machines
- This is done in the /etc/exports file and must agree with the
mapping done by fstab for the diskless machine.
- Define the Diskless system in /etc/bootptab
- An entry is required for each machine using BOOTP. Use the name
and IP address that you assigned in the /etc/hosts file. You'll
also need the MAC address from the card. (See the next paragraph
for cases that the number is not directly available and
your network is small!)
- Define the kernel for the diskless workstation
- This requires that a kernel configuration be defined and then
compiled for the diskless workstation. If it is to be different
from the kernel of the server, you need to keep the two
configurations separate! The boot image formed in this step must
be uniquely named to agree with the 'bf' parameter in /etc/bootptab.
- Initialize the Diskless system's file structure
- Now, you must provide a full root directory
structure at /tftpboot/dcname. The easiest way to do this
is to follow the
script that Ken Yap provides in his
SLUG talk: Setting up a diskless Linux system.
- Set up fstab for the diskless workstation
- This requires that each of the mountpoints for dcname be
listed and that the type be identified as nfs. This is also the
place where sections of the file system should be marked as read
only. This is good in that it would prevent an errant program from
wiping out programs, etc.
The way in which I handled the case of the two kernel configurations
being different was to copy /usr/src/linux/.config to a new name. For
example, you could use '.dcname'. Then rename the original .config
file so you don't accidentaly delete it! Then when you want to
configure the 'dcname' kernel, just copy it to .config and run
'make menuconfig' and then compile the kernel. The resulting image file
is then copied down to the /tftpboot area. (There's probably a better
way to handle this, but it worked for the time being.)
One of the problems I had in setting up the system was in being able
to set the IP address of the diskless system. I found that you needed
to edit three files:
- /etc/hosts
- /etc/bootptab
- /tftpboot/dcname/etc/hosts
(This last file was so that the machine knew its own address when it
went into full networking mode.) Then after these changes were made, I
rebooted the server. (It may have been sufficient to restart NFS, but
I took the lazy way out!) This amount of editing could be a headache
but normally you would not be changing the IP addresses in an
operational system.
I mentioned the problem of determining the MAC address for an Ethernet
card. The way I handled this was to get a copy of tcpdump and then watch
the transactions as the card tried to go through the BOOTP process.
Although tcpdump is included in many distributions, I needed to get a
copy off the net. At that time it was available on the sunsite/metalab
system. However, that has moved and you would need to search for it. I
was able to locate a copy on
freashmeat.net! This gave me a pointer to
www.tcpdump.org - naturally!
Return to top.
OK, now that we have the server set up, it's time to go on to the diskless
workstation. Fortunately, most of the work is done at this point.
But first, let's look at what makes this system. It has:
- 80486DX4 (50MHz)
- 20M RAM
- Standard VGA Display (Trident 9440 Chipset)
- Ethernet card (NE2000 clone with socket for EPROM)
- 1.44M Floppy Drive (Only for the initial part)
- Mouse
- A sound card (Sound Blaster 16 bit ISA cheapie!)
This list is merely what's present. Actual requirements would be based
on the specific application.
Following the procedures outlined in the Etherboot README, get a bootable
floppy that has the image needed for your Ethernet card. Put this into
the 'diskless' PC and boot it up. It's that simple - at least to test
the concept and the basic program. This allows you to verify that the
program you've identified does work with the Ethernet card in your system.
I worked in this mode most of the time as it was a convenient point
to test the BOOTP process and all the table settings before I committed
to an EPROM. That way the changes I made did not introduce a whole lot
of new variables at any given time. It was much easier to debug. If you're
confident of the Ethernet interface, you could go to EPROM immediately.
Once it works, at least to the point
of being able to boot, transfer the corresponding ROM image to a suitable
EPROM. In my case, I did a raw binary copy of the ne.lzrom file
to a 2764A EPROM and put that in the card itself. Once I
disabled the floppy in the system's BIOS, I had a diskless PC!
At this point, after the system booted, I was able to log in to the system.
Because of the drive mappings and the fact that I copied the /etc/passwd
and /etc/shadow files into the /tftpboot/dcname/etc area, I was
able to log in as though I were on the server system!
One problem I had at this point was with the manner in which the
Slackware startup scripts are done. I had just copied them over which
meant that the system tried to do an 'fsck' on the drives, but due to the
BOOTP process, they were already mounted for read/write. My solution was to
edit the startup script and eliminate these steps.
Return to top.
The first presumption here for an application of this type is that this
system will not be used in the normal manner. Namely, the system
is expected to boot up and do something versus the normal 'wait
for a user login'. Depending on the requirements, this system may be
totally headless, meaning that there isn't a monitor or even a keyboard
present.
For this a utility called 'rungetty' is required. I found it
at
nodomainname.net after a quick search on
www.linuxapps.com.
This neat little utility allows you to put an entry in the /etc/inittab
for this machine and have it run automatically. It does require that
you do some compilation, but it's no problem with the Makefile that's
included. You need to remember to copy it into the /bin area for
each of the diskless machines!
Now, to define that application! I had wanted something that would have
a little bit of a 'Gee whiz!' factor. But as I started looking into
various things, I found that to be impressive in any way, I'd need to
setup 'X' and have it run an application. Although I think this is very
do-able, I didn't want to tackle this in the time frame I had. This
would be a project in itself! So after looking around at various sound
packages, I settled on a script that used dialog and the fact that an
.au file could be copied to the audio device. In this way, I set up
an extremely oversimplified simulation task that had some audio
to it.
So now that I have a diskless system that comes up and runs an
application, even though it is a little corny, I can say that the current
project is complete. Since I used rungetty, when the application does
terminate, it starts all over again. Something I hope not to do in the
near future!
Return to top.
Copyright © 2001 David J. Pfaltzgraff, all rights reserved.